Importing Sony HXR-NX80 (XAVC Media) into Adobe Premiere
Important Note #1: This camera can shoot in both the Sony XAVC or AVCHD formats. This workflow follows recording in the XAVC format and we strongly advise students to record in the XAVC format rather than AVCHD. XAVC is both higher quality, and also less problematic when editing with Adobe Premiere. To set this in the camera, please refer to page 111 of the hardware manual for the HXR-NX80 and choose one of the XAVC options for file format rather than AVCHD.
Important Note #2: This camera can capture in both standard high definition (1080p) as well as Ultra HD (4K/2160p). We recommend that students record in standard high definition formats for ease of workflow. To set this in the camera, please refer to page 111 of the hardware manual for the HXR-NX80 and choose the REC FORMAT menu items that says “XAVC S HD” rather than XAVC S 4K.
Important Note #3: If you do record in Ultra HD (4K), the Sony HXR-NX80 will allow you to record low resolution proxy files in additional to your Ultra HD files. We strongly recommend that students turn this function off and instead use Adobe Premiere’s built in ingest proxy generation feature instead.
To find this option in the menus, please refer to the proxy recording section located on page 42 of the hardware manual for the HXR-NX80 and set PROXY REC MODE to “OFF”.
For more information on the Premiere Proxy workflow please refer to this comprehensive youtube video tutorial, or make an appointment with our IT/Post-production staff for an in-person tutorial.
Step 1) When you insert the SD Card from the HXR-NX80 into the card reader, it should show on the desktop of the computer with this icon and usually say “Untitled” or “Untitled 1”:

Step 2) When you open the Untitled Volume, you should see an icon which says “Private”. Open the private folder and you will see a folder within titled M4ROOT. Drag and drop/copy this M4ROOT folder onto your external hard drive from the SD card to copy the contents:

AVCHD Note: If you accidentally recorded in the AVCHD format (rather than XAVC) your files will be located in the AVCHD package (visible in the screenshot above) within the Private folder. If you are unsure which format you recorded in, you can double click on the AVCHD package and see if clips are visible in Quicktime Player which will automatically open. If no clips appear, then you correctly recorded in the XAVC format and can simply copy the M4ROOT folder instead. Be sure to import your media in step 3 before formatting your cards to be sure you copied the correct folder. If you are unsure, the best way to make sure you have your material successfully copied is to test importing them into a Premiere project after copying them to your hard drive.
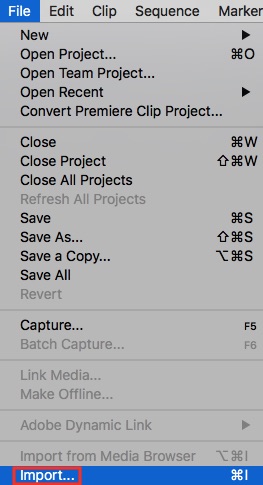
Step 3) Open your Premiere project (or create a new one if you are just starting) and navigate to File -> Import:

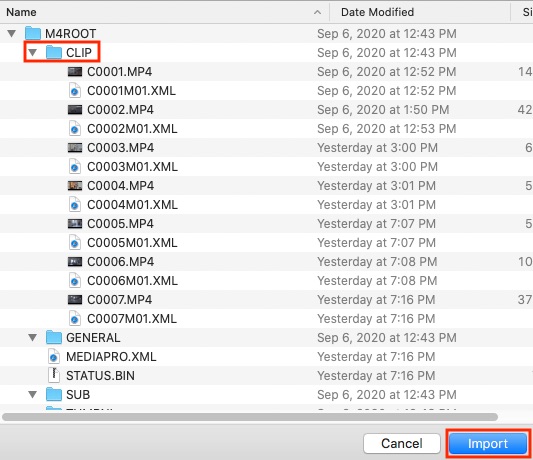
Step 4) Next browse to the M4ROOT folder that you copied to your hard drive, select to the CLIP folder within the XDROOT folder, and choose Import:

Please note that you may receive an error message about not being able to import certain files types. This is common when importing XAVC footage (the preferred format which our Sony HXR-NX80 captures in) because it can’t import other obscure camera-generated files. It should not concern you and you can just click “OK” if this window appears.
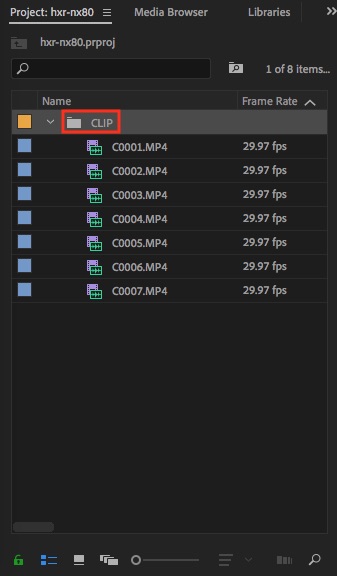
Step 5) You will now see a folder named CLIP in your project panel. It is best practice to rename this to describe the group of footage, otherwise you will have many folders named CLIP on multi-shoot projects.

The easiest way to rename this folder is to right-click on it, and choose Rename from the menu. Alternately you can perform a slower paced double-click which will allow you to rename the folder as well.
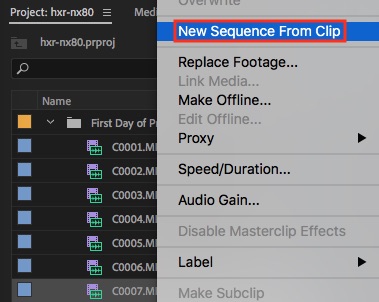
Step 6) If this is your first time using Premiere with this footage, it is always best when starting a project to make a new sequence by right-clicking on a clip in your bin, and choosing “New Sequence From Clip”. This will guarantee that your sequence matches your clip specifications:

Tip: Try downloading and using our Default Premiere Folder Structure Template when starting a new Premiere Project. This can be used to serve as a template for you to insert and organize your media on your hard drive prior to starting a new project which can greatly help.

