
Adobe Premiere Post-Production FAQ
- All media/contents in the Project Library and/or Bins within disappears.
- Newly imported media can’t be found.
- Playing back media is problematic: audio/video content or waveforms is missing, audio/video is looping constantly in one section on playback, or files are playing back media from clips that they shouldn’t be.
- Audio with two sources is coming in as one flat stereo pair instead of discrete tracks (configure Premiere to treat audio the way Final Cut Pro 7 did).
- Audio goes out of sync when moving clips or making edits.
- How to adjust audio levels on a clip.
- How to keyframe audio (only increase the volume in certain areas) on clips.
- A window has disappeared (Project/timeline/effects/etc).
- Playback/performance issues (frames drop/video lag) OR audio goes out of sync with video playback.
- How to make new text/titles.
- How to make scrolling credits.
- Unable to locate newly created Title.
- Video doesn’t fit the frame (Or, how do I resize video to zoom or make smaller?).
- Fonts are missing or fonts changed to a normal/system standard font.
- Source or Program monitor windows are black instead of showing video picture.
- Upon playback or export black frame(s) appear in certain areas.
- File appears offline in timeline/sequence.
- How to export timeline as a standalone file for screening, or upload to web.
- Project takes a substantially long time to open (more than 2 to 3 minutes).
- Video in sequence/timeline appears small, blurry, or appears letter-boxed (e.g. black bars on top and bottom).
- Premiere Pro crashes or says “A low-level exception occurred” when launching the application.
—-
All media/contents in the Project Library and/or Bins within disappears.
The search bar at the top of the Project Library/Bin window most likely contains text. Clear all text from this search bar:

Newly imported media can’t be found.
Media will always import into the bin which is currently highlighted/selected in the Project window. Be sure to pay attention to which bin is selected prior to importing media. If you know the name of the media, you can use the search bar in the upper left to locate media if you know the name of it:

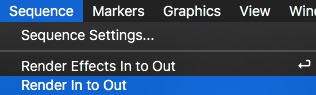
Playing back media is problematic: audio/video content or waveforms is missing, audio/video is looping constantly in one section on playback, or files are playing back media from clips that they shouldn’t be.
Possible Solution #1. Re-render all audio by choosing the menu option Sequence > Render In to Out (hint: your sequence must be active window in the Application first):
Possible Solution #2. Clean the Premiere media cache files.
View this page on Adobe’s official site: How do I manage the Media Cache in Premiere Pro?
After cleaning the media cache quit Premiere, then reopen Premiere, reload the project, and see if the issue goes away.
Possible Solution #3. If the above methods do not resolve the issue, Quit Premiere, navigate to where your “Media Cache Files” is located on your external hard drive, and rename it to “Media Cache Files Old”. This will force Premiere to re-generate the media cache data on clips on next launch from scratch and should resolve any video or audio rendering issues:

Audio with two sources is coming in as one flat stereo pair instead of discrete tracks (configure Premiere to treat audio the way Final Cut Pro 7 did).
Before bringing in your clips, right click on any clips in your Project Library/Bin and choose Modify -> Audio Channels:

Change the number of tracks to 2, and the channel format to mono and click OK:

You may get a message about clips already in the timeline not being affected, click OK. From now on when you bring in clips which you have made this change to, each audio source will come in as a discrete track. If you already added clips into your timeline, you will need to re-insert them to resolve the issue.
Audio goes out of sync when moving clips or making edits.
Possible Solution #1. Verify that Sync Lock is turned ON (not highlighted in Blue) in left portion of your sequence:

Possible Solution #2. A hard drive malfunctioning or running slowly (e.g. USB 2.0) can cause this problem because HD video files are so large. Be sure you have at least a Firewire 800 or USB 3.0 hard drive when editing to avoid this issue.
Possible Solution #3. Many modern cell phones record in a “variable frame rate” which can also cause audio sync issues. If the footage you are working with came from a modern cell phone then it is best practice to follow this workflow prior to editing: Found Footage/Phone Footage to Apple ProRes with Adobe Media Encoder.
How to adjust audio levels on a clip.
First increase the audio clip height so you can see your waveforms by pressing Option and + on the keyboard. Next, with your Selection tool chosen (arrow icon), hover over the center area of your audio track. The arrow will turn white, and you drag-click the audio up or down to incrase the overall level. For more specific adjustments see the FAQ item directly below.

How to keyframe audio (only increase the volume in certain areas) on clips.
Select the Pen Tool in the Toolbar, increase your audio clip height (option + on keyboard), and click in the middle section of the audio track to add keyframes. From there, click and drag on those points to increase or decrease the audio:

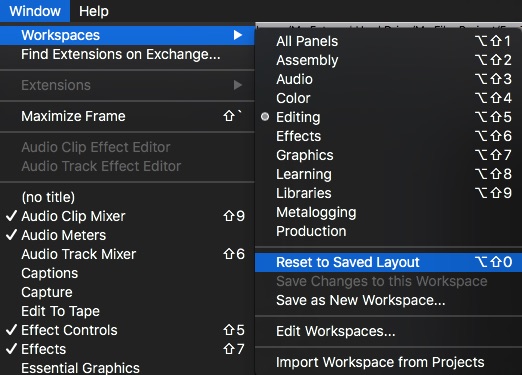
A window has disappeared (Project/timeline/effects/etc).
First verify that you are using the default “Editing” workspace by navigating to Window > Workspaces > Editing. Next, reset the workspace by navigating to Window > Workspaces > Reset to Saved Layout:
Playback/performance issues (frames drop/video lag) OR audio goes out of sync with video playback.
Possible Solution #1: This is common when using an older computer (pre-2016 in most cases). Please review the tutorial specific to addressing this issue here: Optimizing Adobe Premiere Settings/Sequence on Low Performance Computers (or Complex Projects)
Possible Solution #2: Many modern cell phones record in a “variable frame rate” which can also cause audio sync issues. If the footage you are working with came from a modern cell phone then it is best practice to follow this workflow prior to editing:Transcode Found Footage/Phone Footage to Apple ProRes with Adobe Media Encoder
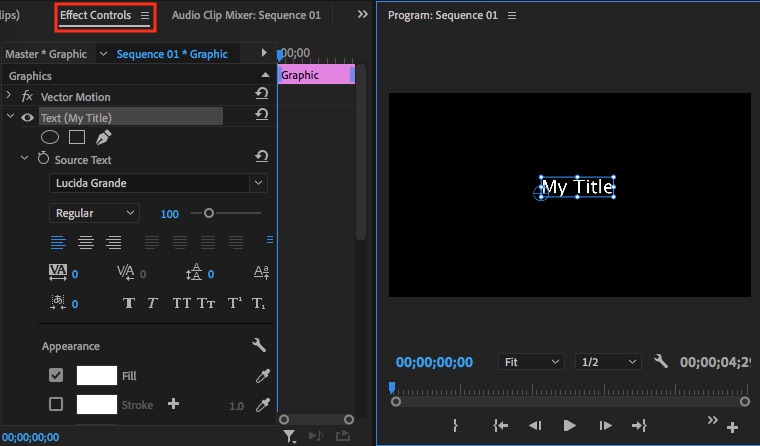
How to make new text/titles.
Premiere Pro now has a dedicated tool built into the tool bar for this as shown here:
![]()
Once you have chosen this tool, simply click anywhere the in Program window (top right window that shows the video of your project. Once you have typed content, you can adjust it further by going to the window in the top left of the interface called “Effect Controls”:
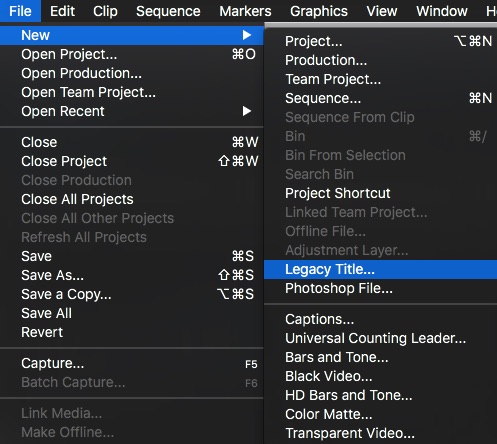
How to make scrolling credits.
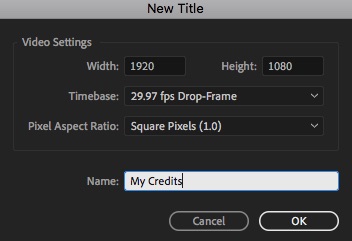
First, make a new legacy title by navigating to File > New > Legacy Title:
The default values in the next pop-up window should be fine because they will match your current sequence settings. Give the title a name in the “Name:” field and click ok:
When the new title window is open, press the Roll/Crawl Options button in the upper left-hand side of the window and the options pictured below:
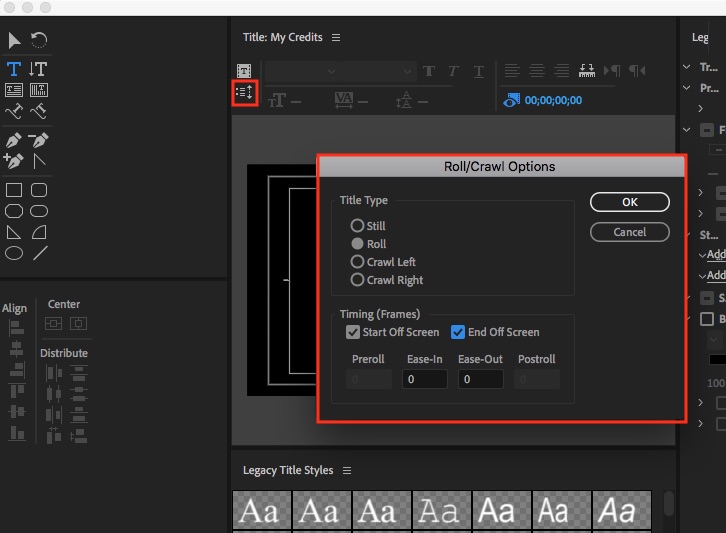
Note: after selecting these settings, you will need to populate data into the window us the type tool (shown as a blue T character in the above screenshot) in the legacy title interface. When finished building your content for the legacy title, drag and drop the legacy title file from your Project Panel into your sequence.
Unable to locate newly created Title.
All new titles created with the newer Title tool (in the main toolbar) will appear the active sequence and not in your project bin:
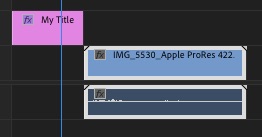
However, titles created using the legacy title tool will make a title file in the project library/bin. You can double click to open and edit it again, or drag and drop it into the timeline to add it to a sequence.

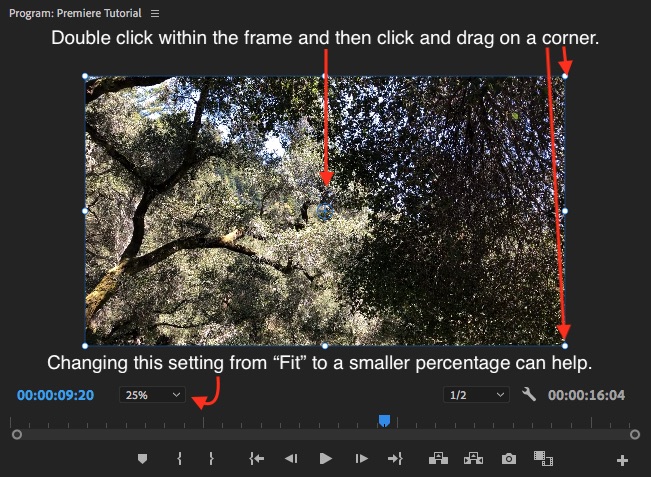
Video doesn’t fit the frame (Or, how do I resize video to zoom or make smaller?).
Double-click on the image frame in program monitor, this will show a bounding box of the frame, which allows you to click and drag on the corners to increase or decrease size. Hint: to zoom into the frame easily, click the view mode from “fit” to 25% or lower, which will give you extra space to increase the size of the video.
Fonts are missing or fonts changed to a normal/system standard font.
Check for the warning sign in the bottom right of the Premiere interface(![]() ), if a font was missing on the system you can double click on this icon to open a new window and this will tell you if there has been a font mismatch or replacement:
), if a font was missing on the system you can double click on this icon to open a new window and this will tell you if there has been a font mismatch or replacement:

You will either need to pick a more standard font for that text in your film, or install the font on your workstation. Note, it is possible to install fonts on our edit suite stations, however, they must be reinstalled every time prior to opening your Premiere project to avoid an unwanted font substitution from occurring.
Source or Program monitor windows are black instead of showing video picture.
First verify that your playhead is hovering over an area which you are sure contains video data in your timeline or bin. Next make sure that you’re in composite video viewing mode by clicking on the Wrench icon in either the source monitor or Program monitor (wherever you are experiencing the issue:

Upon playback or export black frame(s) appear in certain areas.
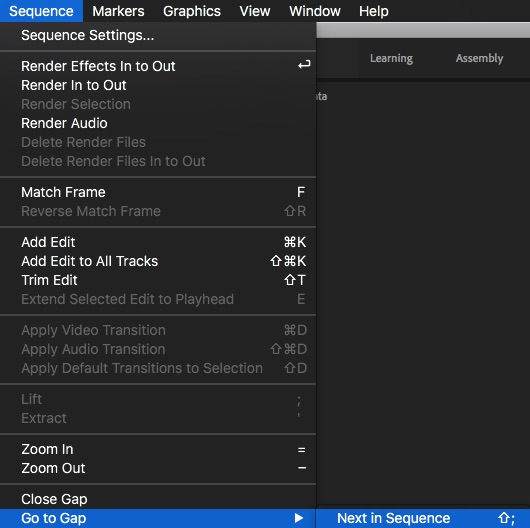
With your sequence selected, navigate to the top menu item Sequence and choose Go to Gap -> Next in Sequence:
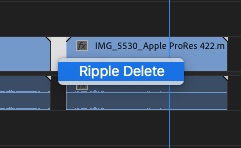
Next, right-click on the area it moves your playhead to and choose “Ripple Delete”. This will remove the black frame(s) from the section and resolve the issue. Note that you may need to press the + key on the key board to see the gap:
File is marked red in timeline and reads as “Media Offline”.

Right-click on the file in timeline and Choose Reveal in Project:

Next, right-click on the file in Project window and choose “Link Media”:

A new window will pop open and you will need to click on the “Locate” button. From there you will need to relocate where the footage exists on your hard drive, select the clip(s), and click OK. If the footage matches, it will fix the issue.
Important: NEVER rename .MTS or .MXF camcorder files on your hard drive. This will cause Premiere to knock the files off-line and they will be very difficult to reconnect.
Also if you have had to re-transcode footage to import, the timecode/metadata may mismatch. In this situation, when right-clicking on the clip, choose “Replace Footage” instead of Link Media. This will help preserve your current edits if the footage doesn’t match frame for frame.
How to export timeline as a standalone file for screening, or upload to web.
Please see our Tutorials & Workflows section which contains many different tutorials on exporting using Premiere for a film screening or for web streaming (Youtube/Vimeo).
Project takes a substantially long time to open (more than 2 to 3 minutes).
Be sure to follow the steps in our “Configuring Adobe Premiere For Mobility” tutorial. Following this workflow will help avoid this issue which is presented by Premiere always re-generating cache files.
Video in sequence/timeline appears small, blurry, or appears letter-boxed (black bars on top and bottom).
It is most likely that you are editing your HD footage in a non HD or incorrectly formatted sequence. It is always best practice when starting a project to make your sequence by right-clicking on a clip in your bin, and choosing “New Sequence From Clip”. If, however, you have already edited a lot and run into this issue, please schedule an appointment with the department post production/technical support to assist you in correcting the issue without having to start over. It is resolvable, but requires many technical steps.

Premiere Pro crashes or says “A low-level exception occurred” when launching the application.
This can be caused by corrupt application preference files. To resolve this, hold down the Option key (Mac) or Alt key (Windows) and click on the icon to open Adobe Premiere Pro. Eventually you will be greeted with this message asking if you want to reset your preferences:
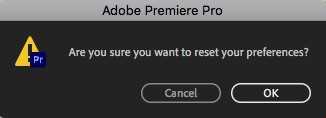
Choosing this option will reset the application preferences and potentially fix the issue. Just be aware, you will need to start over with some custom application preferences that you may have set, such as the current workspaces, window layout, etc.